

This scatter object allows for multiple mesh objects to be scattered using colors on a source texture or textured object in the scene, multiple color masks can be defined per layer to give advanced control over where meshes appear and with the option for a second texture to control scaling of scattered objects you have even more control. The meshes will be combined into new meshes so reducing draw calls and improving performance. There are controls to control how many objects and which type the object will scatter, the areas to scatter to and the variations for each object scattered in to the scene.
How to Use
To add a MegaScatter mesh object to your scene you just need to go to the GameObject menu and then ‘Create Other/MegaScatter’ and select ‘Scatter Mesh Texture’. A Scatter mesh object will be added to your scene and named ‘Scatter Mesh Texture’. In the inspector you will see an option to select a ‘Texture’ this is where you select any texture in your project as the scatter color texture where each color on the texture can be used to define a region for meshes to be scattered into. You can choose to select a textured object instead which in some cases can be easier as it is easier to visualize and control the positioning with a textured object. The object will require a collider and if using just the texture then that texture will need to be set to readable before it can be used. The Scatter Cols section in the layer inspector is where you define the color masks you want to use.
Once a texture or texture object has been selected you can set the mode in which the scatter count is calculated either it can be a pure count value or the scatter can be controlled via a Density value. The count mode is the easiest to use as you just set the total number of objects off all type you want the system to scatter and thats it. With the density mode the system will calculate how many objects to scatter based on the area of the spline shapes to be filled and the area of the objects to be scattered in that area. It is advised to start with the Count mode as depending on the import settings for meshes etc a high density value with tiny meshes can lead to 1000’s of objects being scattered which could take a while, so it is best to setup the scatter with the Count mode and then if the Density mode is required switch to that and set the value at the end.
Now we can start to add the objects we want to scatter,
Below is a break down of all the controls available to you with the MegaScatter Mesh Texture component. Clicking the ‘Add Mesh’ button will add a new object to the list of objects to scatter. When added the inspector will show all the options to control how this mesh is to be added to the scene, first thing to do is to name the layer and select the object to scatter by clicking the ‘Object’ option in the inspector and selecting a mesh based object such as a rock. You will now need to setup the color masks to use for this layer. See the Scatter Cols section below for more on that. Clicking the green ‘Update’ button will now scatter that object to the scene and you should see it appear. Once you have the object appearing in the scene you can go ahead and start tweaking all the various options to control how and where the objects are scattered. Below you will find a complete description of each option and what effect it has on the scattering process.
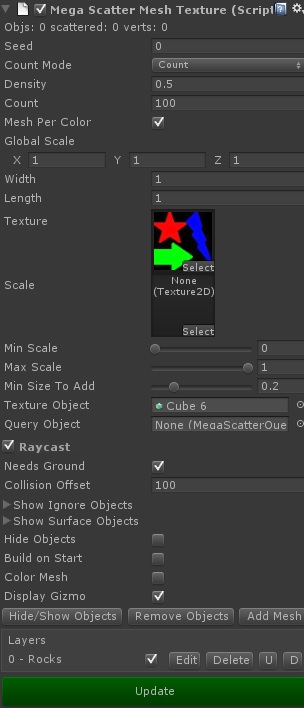
Scatter Mesh Texture Params
These options control the general behaviour of the scatter and will effect all the meshes that are scattered.
Info
The top label shows how many objects have been created by the scatter, how many objects were actually scattered and the number of vertices that were created.
Seed
The random number seed to use for general scatter random values. Each mesh layer has its own seed value as well for more control.
Count Mode
The mode used to control how many objects will be scattered in the scene. If Count mode is selected then the count value below will control how many objects will be scattered. If density mode is chosen the the density value along with the area of the splines and objects to be scattered will be used in the calculation. It is best to start with Count mode.
Density
The Density of meshes to be scattered, the higher the value the more objects will scattered. The area of the splines along with the area of each mesh is taken into account when calculating the count, so changing the scale values of the meshes etc will change the number of objects scattered. Be careful if you have very small values and high density values as it could lead to a lot of objects being scattered.
Count
The number of objects to scatter in Count mode. Note this is the maximum number that will be scattered in some cases the system may run out room to scatter the meshes into if you have no overlap on in which case you may not get the exact number of objects added.
Mesh Per Color
If you have defined multiple color masks you can ask the system to create a new mesh for each shape instead of combining to one large area.
Global Scale
A scale value that will be applied to the whole scatter object, makes it easy to adjust the size of everything instead of scaling each object layer.
Width
If not using a textured object then this defines the width for area of scatter for object.
Length
If not using a textured object then this defines the length for area of scatter for object.
Texture
The texture map containing the colored regions to use to control the scatter.
Scale
An optional texture to use to control the scaling of any objects scattered in the scene. The scaling is controlled by the red channel in this image.
Min Scale
When using the scaling texture you can control the min and max scale value that are lerped between with the scaling color.
Max Scale
When using the scaling texture you can control the min and max scale value that are lerped between with the scaling color.
Min Size to Add
You can set a cut off scale value below which an object will not be scattered into the scene.
Texture Object
Instead of using a texture and the width and length values to define the scatter area you can choose to use a textured object in the scene, the object must have a collider attached.
Query Object
Unused at the moment but in future updates you can use a custom class to write your own scattering rules etc for custom scattering.
Raycast
Tells the system that the scattered objects should be positioned on top of selected colliders. With this mode on you will need to add the objects you wish to scatter on by opening the Shows Surface Objects section below.
Needs Ground
If raycast is on setting this means the scatter system must find a surface object for each scattered object, if not checked and no surface found the object will be added at the height of the shape.
Collision Offset
Offset above the object to start the raycast from, this usually does not need to be changed.
Show Ignore Objects
This will open the section where you can define which objects the system should not scatter on or near, see below.
Show Surface Objects
This opens the section where you can define the objects that can be scattered on, see below.
Hide Objects
When you update the scatter objects will be added to the scene, this could be a lot of objects and you may not want them showing up in the hierarchy etc, checking this will hide any created objects from the project hierarchy.
Build On Start
Check this to have the system scatter the objects when the scene is started. You would normally test the scatter in the editor and then click the Remove Objects button before building the scene and having this option checked for the scatter to be recreated at start greatly reducing file sizes and load times.
Color Mesh
You can ask the system to color the meshes in a way that means they can be moved by suitable shaders for effects like blowing in the wind. This mode also needs to turned on if you want the system to change the vertex colors to use the color variation options below.
Display Gizmo
Shows the various gizmos for the object such as the height limits.
Hide/Show Objects
This will turn off and on all the objects that were scattered, this makes it easy to disable the generated scatter objects to make the scene less cluttered in edit mode or just to disable areas that can be turned on later such as rubble scatters for destroyed buildings.
Remove Objects
This will remove all the scatter objects that were created.
Add Mesh
Clicking this will add a new object to be scattered by this object.
Layers
Shows the current layers the object will scatter, you can disable layers here as well as deleting or changing the scatter order.
Edit
To edit the params for the layer click the Edit button this will then show the params for that layer in the inspector.
Delete
Delete the mesh from the scatter layers.
U
If you have no overlap set then the order the meshes are scattered will have an effect on the scene, usually it is best to have the layer with the lowest weight or more important to the scatter first going to less important. Clicking this will move the layer up one in the list.
D
As above but will move the layer down the list.
Show Splines
If you open this section you can select the splines that are to be included in the scatter.
Update
Click the green update button to re scatter the objects in the scene.

Ignore Objects
This section controls which objects are ignored from the scattering raycast tests.
Object Select
You can pick any object in the scene with a collider attached to be used as a ignore object.
Delete
Delete the object from the ignore list.

Surface Objects
This section controls which objects are to be scattered on.
Object Select
You can pick any object in the scene with a collider attached to be used as a surface object.
Delete
Delete the object from the surface list.

Splines
In this section you can control which splines are used by the scattering object. You just need to check and uncheck the box for each spline depending on whether you want it included or not.

Mesh Layer Params
This is where you can control the scattering for each layer in the object, you have complete control over how each layer of the scatter behaves by changing the params in this section.
Name
Name for the layer.
Enabled
Whether or not this layer is to be included in the scatter.
Mark Static
Mark any object generated for this layer to be marked as static in the scene.
Add Color Mask
This is where you can add any number of color masks to be used by this layer. The system will check the scatter location on the texture and if the color found there is between the first and second color for any of these masks then the object will be scattered at that point.
Color
The low and high colors to use for this mask.
Delete
You can delete a color mask by clicking this button.
Object
The object mesh that will be scattered into the scene. This should currently be a single object, ie no children. Only the mesh data will be scattered any other components attached to the object will be ignored, if you need that then you should use the Scatter Object version.
Counts Per Curve
You can override the count value and say that the count for this layer should be per spline in the shape as opposed to the count being split across all the splines.
Force Count
Again you can override any count with this value this will force the scatter system to scatter this many objects (unless it is higher than Max Count) regardless of the weight value or other settings. Set to 0 for no force count to be used.
Max Count
This will limit the number of objects scattered. Set to 0 for no limit to be used.
Weight
How much this layer will contribute to the total scatter count, the lower the value the less of the object will be scattered.
Scale
Amount to scale the mesh by, this is useful for source meshes that have different sizes, you can easily get them to match by changing this value.
Offset Low
A random offset can be added to each object before it is added, this is the low limit of the offset to use.
Offset High
A random offset can be added to each object before it is added, this is the high limit of the offset to use.
Pre Rot
It may be required that the mesh needs to be pre rotated before it is scattered to the scene, change this if your scattered objects are not in the correct orientation by default.
Rot Low
A random rotation can be added to each object before it is added, this is the low limit of the rotation to use.
Rot High
A random rotation can be added to each object before it is added, this is the high limit of the rotation to use.
Uniform Scaling
For random scaling you can tell the system to randomly scale the object in a uniform if so check this, the scaling values below will be limited to a single value which will be used for all axis.
Scale Low
A random scaling can be added to each object before it is added, this is the low limit of the scaling to use.
Scale High
A random scaling can be added to each object before it is added, this is the high limit of the scaling to use.
Snap
You can tell the system to snap any scattered object to these snap settings, use a 0 value for no snapping.
Snap Rot
You can tell the system to snap any scattered objects rotation to these snap settings, use a 0 value for no snapping.
Dist Curve
This curve will change how the random variations are defined. If it is a straight line from 0 to 1 then it will be an even random distribution, but if you want more variation towards the higher end you can adjust the curve to be steeper to one earlier etc.
Seed
The seed value t use by the random number generator for this layer.
No Overlap
By default the system will scatter objects not checking for whether it is over lapping a previously scattered object, if you check this the system will use the Radius value below to make sure it does not overlap other scattered objects.
Clear Overlap
You can tell the system to clear the overlap table before scattering the layer by setting this.
Radius
The radius of the object that is being scattered, used by the overlap system. This will be adjusted by any scaling values for you.
Col Radius Adj
When the objects are being scattered they will check the ignore objects list to see if it is allowed to be scattered in that position, this value can be used to increase or decrease the radius of the check against these objects so you can make sure no object is scattered within that radius of the ignore object.
Ray Count
When the system is checking for ignore objects it will use a multiple raycast, all those rays need to be clear of any object this will stop objects hanging over edges etc, the more rays used the more accurate the test will be.
Align
Tells the system how much the object should be aligned to the surface it is scattered on, a value of 0 means no alignment will be done, a value of 1 means the object will totally aligned to the up value of the surface.
Min Slope
You can control whether the object is scattered onto sloping areas, so you can easily scatter plants onto say only flat areas by setting the max slope value to a low value.
Max Slope
The high limit for the slope the object can be scattered on.
Collision Offset
Vertical offset to add to the mesh, this can be used to make sure objects sit nicely on the surface depending on where their pivot point is.
Use Height Limits
Objects can also be limited to vertical zones of the surfaces, turn this on and two planes will be displayed that show the upper and lower limits of where this later can be scattered.
Min Height
The lowest point past which the object will not be scattered.
Max Height
The highest point past which the object will not be scattered.
Col Curve
This curve is used to control the alpha value used in meshes, this alpha value could be used by shaders to control the amount a mesh is effected by wind etc. Using this curve you can control how stiff a plant is for its height etc.
Color Variations
This sections shows the color variations section. See below.
Vertex Limit
You can set the maximum vertices in a mesh before a new object is created in a scene. Usually you would leave this at a high value to reduce the number of objects generated but it maybe you want more objects to increase culling or obstruction checks etc if so reduce this value.
Vertex Noise
If the scattered objects look too similar for you liking you can get the scatter system to add some vertex noise to each scattered mesh, so if you were scattering bricks you could make each one slightly different by turning this option on, same for plants etc.
Noise Scale
How similar the noise is based on distance, higher values will give a more jaggy look to meshes.
Strength
How much noise on each axis is added.

Color Variations
If the color mesh option is on you can ask the system to change the vertex colors randomly with the colors you add here. This could be used to add different colored flowers to a scene from a single object source.
Add Color
Add a new color to the variation list.
Color
The color to be used.
Delete
Delete the color from the list.
Video Tutorial
Video guide to the Texture Scatter.

You must be logged in to post a comment.


